
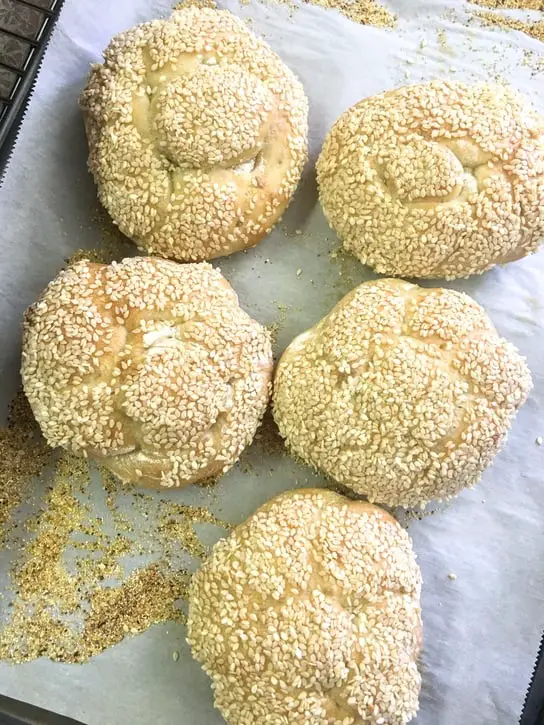
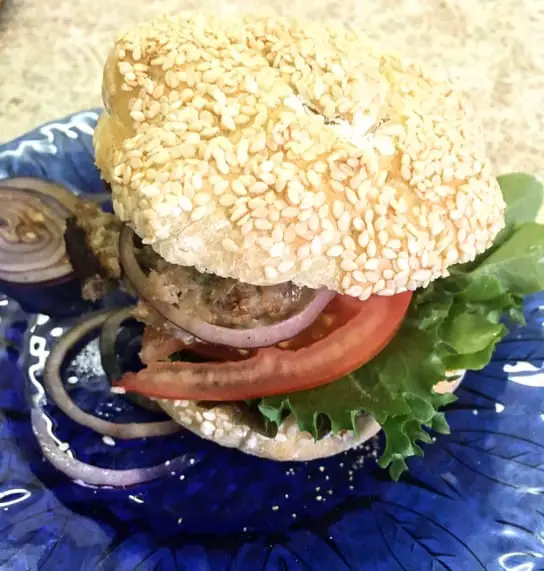
Soft and crusty bakery-style kaiser rolls are everything you could ask for when making a deli sandwich or fixing hamburger.
MAKING KAISER ROLLS FROM SCRATCH
We don’t need very much when making kaiser rolls from scratch because the ingredients are simple and the tools are minimal.
For one, we will need a kitchen scale to weigh the ingredients.
As convenient as cup measurements are, they aren’t precise, and precision is key for bakery-style kaiser rolls.
The other tool you might want, apart from a couple of baking sheets, is a stand mixer with a dough hook attachment.
While you could work this dough by hand, it is quite sticky, so a stand mixer is ideal if you want to keep everything as neat and tidy as possible.
If you plan on baking these rolls a lot, you might want to consider investing in a kaiser roll stamp, or you can do as I do and knot the buns.
KAISER ROLL TUTORIAL VIDEO
Join me as I walk you through how to make these classic kaiser rolls from start to finish. If you’re new to the Kitchen though, you’re about to find out that I do things a bit differently here…
This post may contain affiliate links, meaning that if you choose to purchase something after clicking on one of the links in this post, I may earn a small commission at no additional cost to you.
THE INGREDIENTS
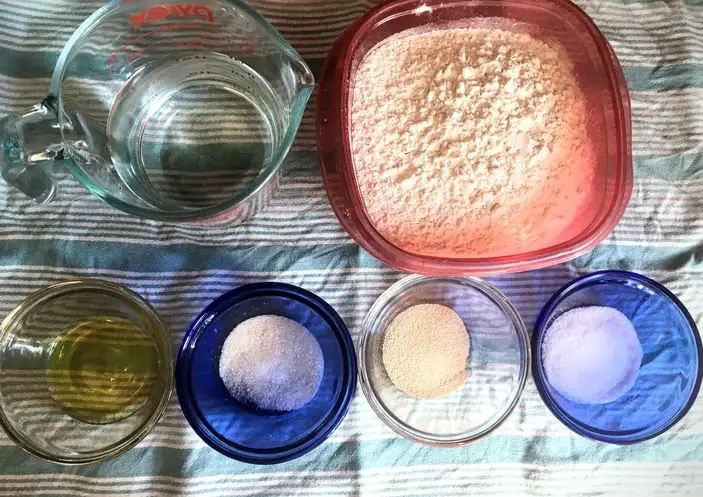
Let’s begin by scaling out the following ingredients.
Water 325g
Bread Flour 500g
Sugar 10g
Salt 10
Extra Virgin Olive Oil 15g
1 Egg White
Flour for dusting
Cornmeal for dusting
Seeds for sprinkling ie. sesame seeds, poppy seeds, sunflower seeds, flax seeds, etc.
MIXING THE DOUGH FOR KAISER ROLLS
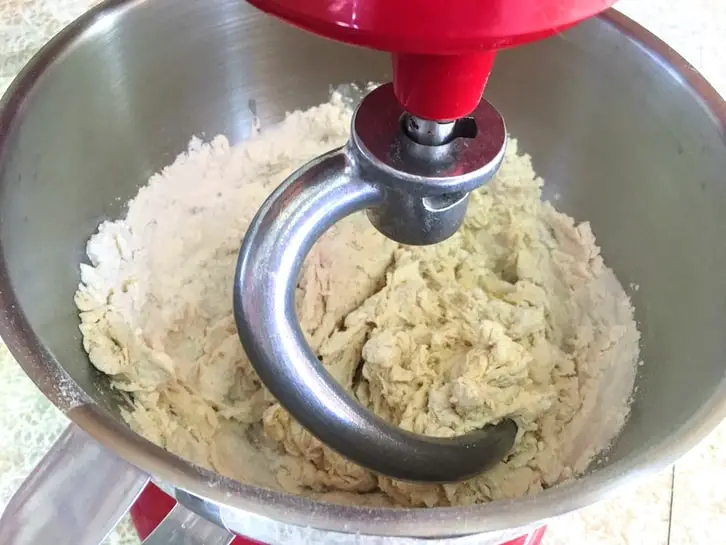
Begin by proofing the yeast and water in the mixing bowl for five minutes, then stir to dissolve the yeast.
Next, add the flour, salt, sugar and oil to the mixing bowl and let the stand mixer do all of the work.
Using the dough hook attachment, set the mixer to medium speed for 8 minutes, or until the dough is well-developed and begins to ball up.
If you’re using a Kitchen Aid stand mixer, the second-speed setting is perfect!
LET THE DOUGH REST
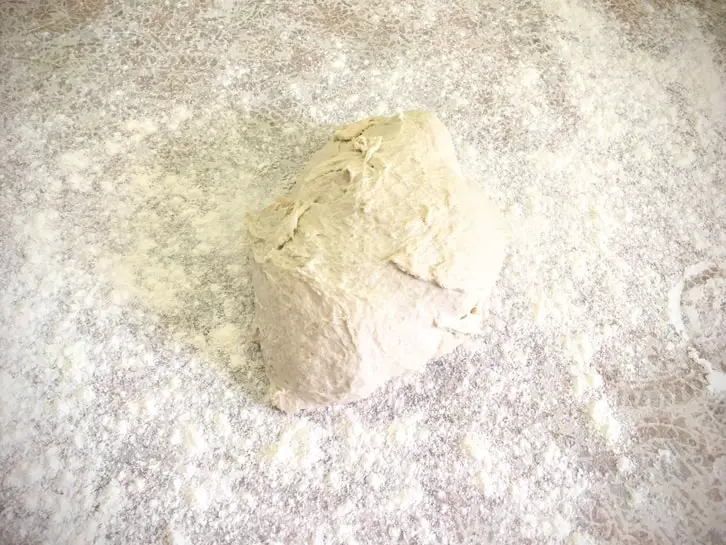
On a well-floured work counter, turn the dough out of the mixing bowl.
Sprinkle the dough with flour and cover it up to prevent crusting.
I like using a damp tea towel, but plastic wrap will also do the trick.
Let it ferment for the next 45 minutes, then lightly punch down the dough and allow it to rest for an additional 15 minutes.
DIVIDING AND SHAPING THE DOUGH
When it comes to dividing the dough, there are two ways around it.
For a quick and dirty job, shape the dough into a circle and make six even cuts.
If you want your rolls to be as uniform as possible, then scaling the dough is the way to go.
Weigh the mass of dough, (which should be around 850g if you scaled your ingredients), divide that number by twelve, and weigh out twelve balls of dough.
If you’re using a kaiser roll stamp, round the balls of dough and let them rest for 5 minutes.
Pro tip: dust everything with rye flour during this stage so that the kaiser roll design will bloom properly during baking.
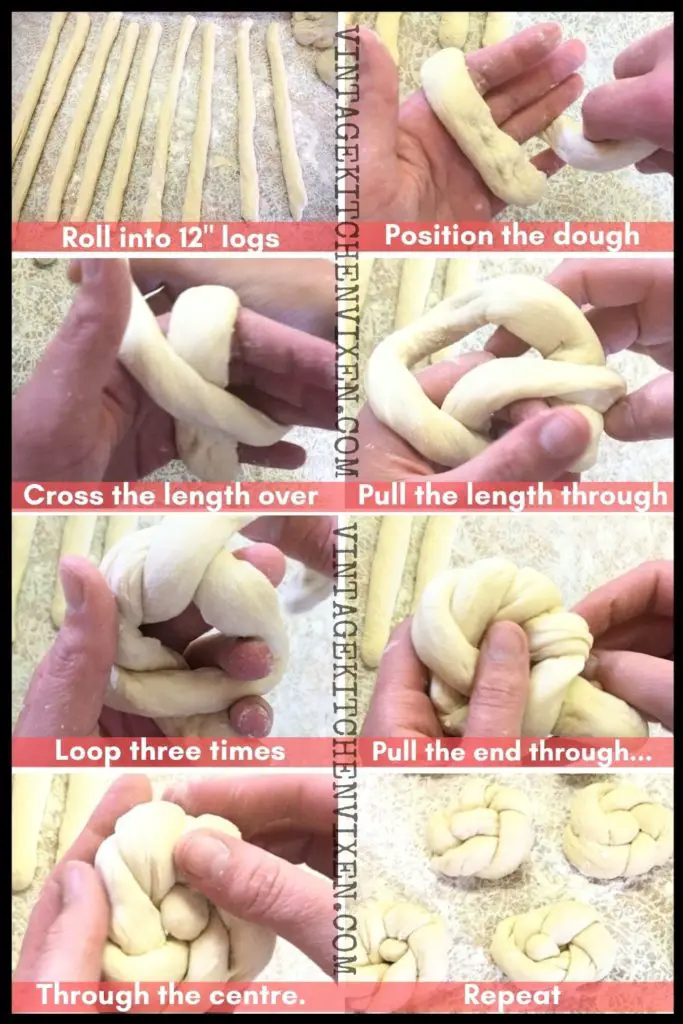
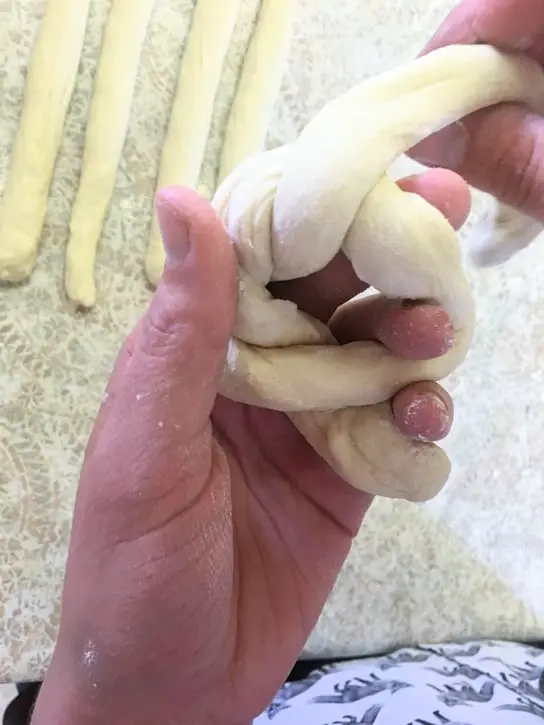
The other way to get a kaiser roll design is to braid the dough.
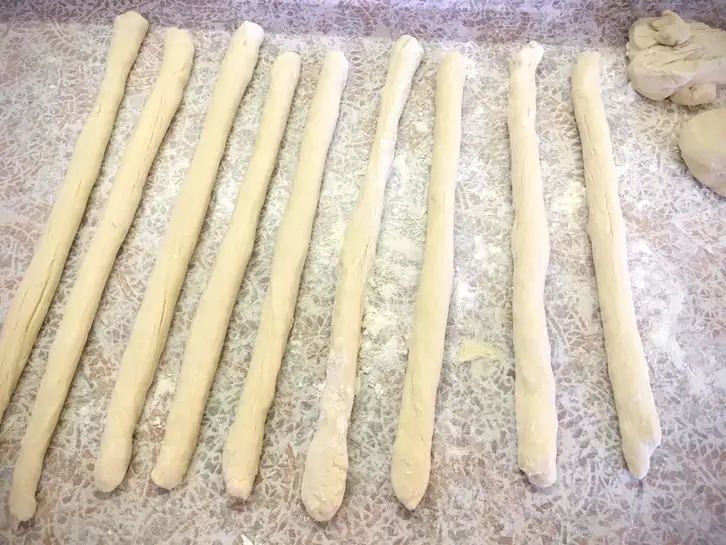
Roll the scaled units into even 12″ long logs and let them rest.
Then braid them, like so:
If you’re going the route of the stamp, press the design on top of the rounded balls and turn them upside-down on the flour-dusted counter for a 60% proof.
The braided rolls can remain right-side up.
A BRAIDING TIP
The idea of knotting or braiding the buns might scare you, but it’s easier than you might think!
If you’ve never shaped bread this way before, practicing with play-dough can be a real confidence booster.
The truth of the matter is, achieving uniformity comes with practice and repetition.
Maybe your first batch won’t be picture perfect, but hey, there’s beauty in rustic bread!
Besides, even if kaiser rolls don’t look perfect, it’s the taste and quality of the ingredients that really counts.
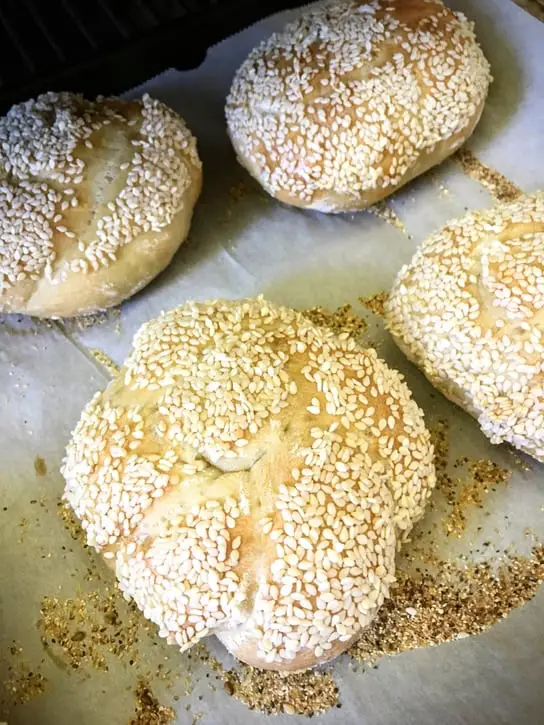
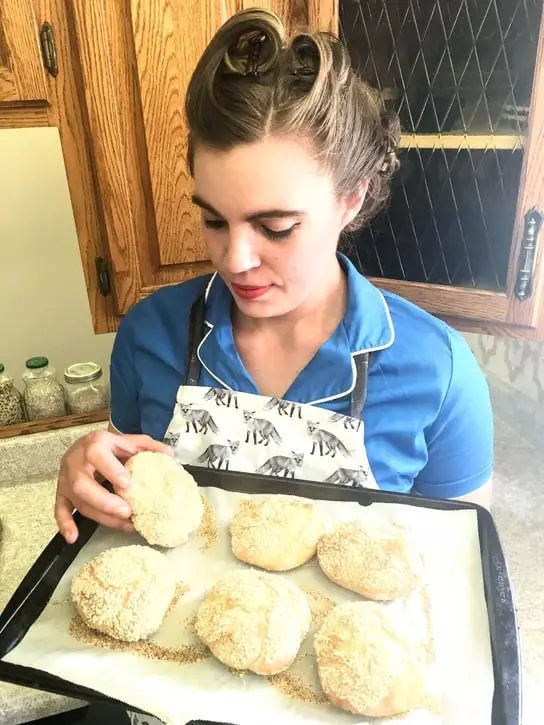
PANNING AND FINISHING THE KAISER ROLLS
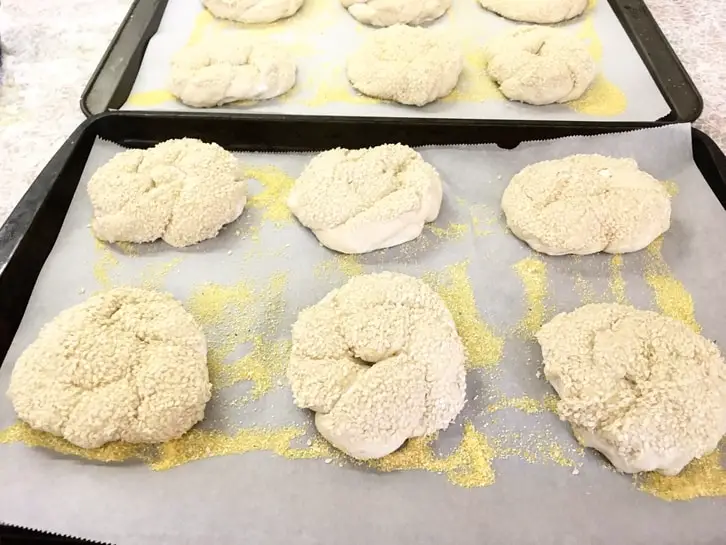
When the rolls are proofed, brush them with egg white and dip them into a bed of seeds.
Since egg white can be a bit stringy due to the chalazae, adding a touch of salt will break it down, giving it a smoother consistency (check out my post on egg theory if you want to learn more things about eggs you never knew before).
This probably goes without saying, but turn any stamped units right-side-up before brushing them!
Next, place the seeded buns right-side-up onto a parchment-lined, cornmeal-dusted baking sheet and let them proof one last time until they’re nearly doubled in size for an 80% proof.
While the kaiser rolls are proofing, preheat the oven to 425ºF/220ºC.
Pop the proofed buns into the oven and bake for 15-20 minutes until golden.
FREQUENTLY ASKED QUESTIONS
Do you have a question that hasn’t been anywhere else? Ask away in the comments!
DO KAISER ROLLS FREEZE WELL?
They sure do!
My small family can’t get through a dozen buns by ourselves, so we often freeze half by storing them away in a large freezer bag.
The sooner you use them, the better, but try to use them within 3-6 months.
CAN I USE ALL-PURPOSE FLOUR INSTEAD OF BREAD FLOUR?
The reason bread flour is called for is that it has a higher gluten content, which is ideal for bread.
Can I tell you a secret though?
I almost always cheat by using all-purpose flour in my bread making adventures! Shh!
DOES THE TEMPERATURE MATTER?
I wanted to make this recipe as no-fuss as possible, but if you’re okay with doing more fussing than what’s already prescribed, then turn to the temperature.
I’m not going to ask for specific water temperatures (yes, that kind of precision is a thing amongst serious bread bakers), but you might want to adjust the room temperature.
The desired dough temperature is 75ºF/24ºC, so if possible, let the dough ferment at that temperature.
BAKING BURGER BUNS
Honestly, there’s nothing better than homemade bread, and if you’re anything like me, you don’t trust the ingredients found in most commercial bakery products.
These kaiser rolls are something special (and they have a history, too), and if all goes well, folks will be asking you where you got them from!
I sure hope you’ll come back to let me know how they turn out for you and to leave a quick rating.
Anyhow, kaiser rolls make terrific sandwich vessels and I love using them for hamburger buns.
Speaking of burgers and sandwiches, here are some of my other posts you might be interested in!
OTHER POSTS YOU MIGHT BE INTERESTED IN…
Cast-Iron Skillet Beef Burgers (how to make burgers from scratch)
Pork & Shrimp Burgers (they might sound weird, but they’re SO good)
Croques Monsieurs (French ham and cheese melts with white sauce)
Kefir Cheddar Thyme Biscuits (you can use buttermilk, too!)
SHOP THIS POST
Bench Scraper (it’s one of the ten baking tools you CANNOT be without)
PRINTABLE RECIPE CARD FOR KAISER ROLLS

Kaiser Rolls
Equipment
- Stand Mixer
- Dough Hook Attachment
- Baking Sheets x 2
- Kaiser Rolls Stamp (optional)
Ingredients
- Water 325g
- Active Dry Yeast 7g
- Bread Flour 500g
- Sugar 10g
- Salt 10
- Extra Virgin Olive Oil 15g
- 1 Egg White
- Flour for dusting
- Cornmeal for dusting
- Seeds for sprinkling ie. sesame seeds poppy seeds, sunflower seeds, flax seeds, etc.
Instructions
- Add the water and the yeast to the stand mixer bowl and allow it to proof for 5 minutes. When it looks frothy, give it a stir to dissolve the yeast.
- Add the flour, salt, sugar, and oil to the mixing bowl to join the yeast.
- Mix the dough on medium speed for 8 minutes, or until it looks well developed.
- Turn the dough out on a flour-dusted counter, sprinkle it with flour, and cover it to prevent crusting. Allow it to ferment for 45 minutes.
- Punch the dough down and rest it for another 15 minutes.
- Divide the dough into 12 even units. If you're using a stamp, round the dough into balls and let them rest for 5 minutes before stamping. If you don't have a stamp, roll the units into 12" logs before letting them rest for 5 minutes.
- IF STAMPING: Press the Kaiser roll stamp on top of each unit and turn them upside down, giving them a 60% proof before transferring them to the baking sheets.
- IF KNOTTING/BRAIDING: Shape the dough as shown in the video, then give them a 60% proof before transferring them to the baking sheets.
- Line the baking sheets with parchment paper or silicone mats and dust them with cornmeal.
- Brush the rolls with the egg white (make sure to flip them over first if you used a stamp) and dip them in the seeds, transferring them to the baking sheets.
- Proof the rolls until they're almost doubled in size (an 80% proof), preheating the oven to 425ºF/225ºC while you wait.
- Bake the rolls for 15-20 minutes until they're golden brown, then transfer them to a cooling rack.
Notes
- If using a stamp, dust the counter with rye flour before pressing the rolls, as rye flower will help maintain the design during baking.
- Adding a touch of salt to the egg white will help break it down for a more consistent coating.
PIN IT FOR LATER
Love and gratitude,


Leave a Reply